Updated October 12, 2021
G7's global firmware version 3.450R1 is coming soon! It will be available on October 18, 2021.
This firmware version includes some exciting new features:
Scroll down this page to read more about each feature, or select a specific feature from the list to jump to that section.
NEW DEVICE SOUND
G7 has used three distinct alarm sounds since it was first released. Blackline Safety has discovered after years of G7 being used in the field that some lower urgency notifications on the device — like low battery or bump test reminders — interrupt work and demand the worker's attention for something that may not need to be addressed immediately.
In order to better communicate G7's needs to our end users, Blackline Safety is introducing a new sound for lower urgency events.
Information sound
This new sound repeats itself on a loop until it is acknowledged by pressing and holding the up and down arrows. Unlike G7's current sounds, this pattern is designed to appear less urgent so that the user knows they are not in danger when they hear it.
This sound will be used for low battery, bump test and calibration reminders, network connection loss and the new timer feature.
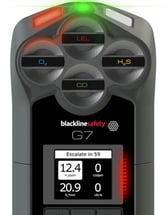
Gas alert countdown
This new feature on G7 will make it easier to prevent false alarms from being delivered to monitoring services. Gases like CO and O2 can spike and dip very quickly, setting G7 into high gas alarm even when gas levels go back to normal. The gas alert countdown is an optional gas feature that creates a time buffer before an alert is delivered to Blackline Live and to monitoring personnel.
How does the countdown work?
 Typically when a device’s high gas threshold — determined in the device’s configuration profile — is crossed, the device will immediately send an alert to Blackline Live. This is done so that monitoring personnel can investigate the incident and follow up with the device user to ensure their safety.
Since the alert is sent immediately, it can create false alarm scenarios, where monitoring personnel will be alerted even though the exposure was momentary and the device user is back in a safe area.
When the gas alert countdown feature is enabled, the device will wait a configured amount of time before sending the alert. G7 will still display red lights and an alert siren sound so that the user knows to leave the immediate area. The banner at the top of the screen will now show the remaining time before an alert is sent to Blackline Live. If gas levels return to normal before this time has elapsed, the alert will be cleared. The gas exposure will still be visible in the device history view on Blackline Live, but will not appear as an alert in the Alerts list.
How do I set up the gas alert countdown feature?
The gas alert countdown feature will be turned off by default. To set up this feature:
1. Log into Blackline Live and go to the G7 configuration profile.
In the gas sensor settings section under each individual sensor, there will be two new settings: a toggle labeled “Gas alert countdown” and a dropdown field labeled “Gas alert timeout”.
2. Flip the toggle on for each sensor you want the countdown enabled for, and determine the length of buffer time from the “Gas alert timeout” dropdown.
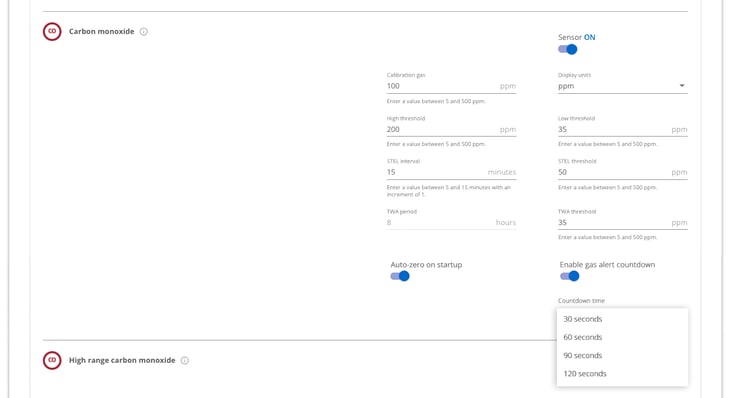
After the configuration is saved and the devices successfully receive the new settings, the gas alert countdown feature will be enabled.
Local time on device
G7 now provides the option of showing the local time on the LED screen. The time will be displayed in the top right of the main status screen. As this is in the same location the check-in timer is displayed, the user will have the option to choose what information they would like to see if they also have the check-in timer feature enabled.
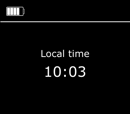
By default, if your G7 fleet is configured with the check-in timer enabled, the screen will display the check-in timer to ensure consistency with previous behaviour.
How can I change the banner display?
To change the information displayed in G7’s main status screen banner:
1. Click OK to open the main menu.
2. Use the up and down arrows to navigate to Settings and press OK to select.
3. Scroll to the "Banner" option. You should see what the banner is currently set to.
4. To change the banner display, simply click the OK button and confirm the change. If the banner was previously set to “Check-in”, it should now be set to “Time” and vice versa. The new state will be shown in-line with the Banner display option.
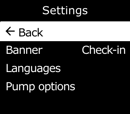

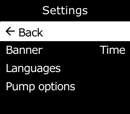
When the user goes back to the main status screen, they should see the selected information shown in the top right corner of the screen.
How can I manually change the time?
By default, the local time feature will use information gathered from nearby cell towers to determine the time zone and current time based on location, similar to how cell phone operates. However, there may be occasions where the cellular connection is unavailable, or your physical location is on a border between time zones. In these cases, the default settings may provide inconsistent time zone information.
To manually set a time zone:
1. Press OK to open the main menu.
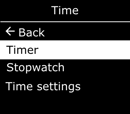
2. Use the up and down arrows to scroll down to select the Time option and press OK to select.
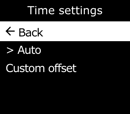
3. Scroll down and select "Time settings".
4. Select “Custom offset”.
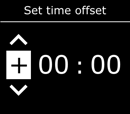
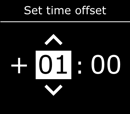
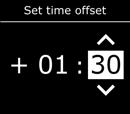
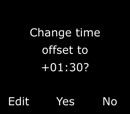
5. On this screen, use the up and down arrows to scroll through offset options and press OK to confirm. Determine +/- first, then the number of offset hours, and lastly the offset minutes if applicable.
NOTE: Time zone offsets are relative to GMT (0:00). You may need to look up the offset of your local time zone with respect to GMT — remember to consider daylight savings as well if your region uses it.
6. Once you have entered the offset, press the OK button to confirm. You can take this opportunity to go back and edit the offset if you made a mistake, or cancel if you no longer want to set an offset.
Once you have input and confirmed the offset value you would like to use, go back to the main status screen. The screen should now be displaying time-based on that custom offset value.
If you would no longer like to use a manual offset, simply select the “Auto” option from the Time settings menu and the G7 will go back to using cellular information to determine the local time.
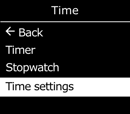
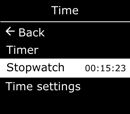
Timer
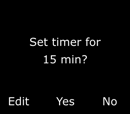
G7 now includes a feature that allows a user to set a custom length timer right on the device.
1. Press the OK button to open the menu
2. Scroll down to the Time option and press OK to select.
3. Select the “Timer” option.
4. Select the unit of time (seconds or minutes) and then the amount of time.

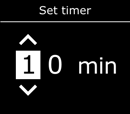
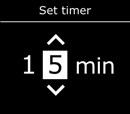
5. Press OK to confirm your selection. You can take this opportunity to edit your timer length if you made a mistake.
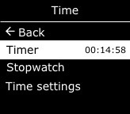
Once the timer is set, you will be able to see the remaining time in the Time menu, in-line with the "Timer" option. You can stop the timer early by selecting the “Timer” option and pressing the up button to clear the current timer.
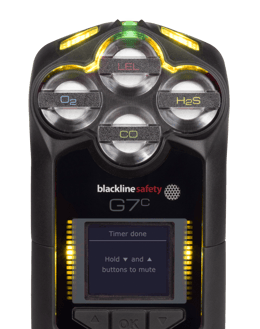
If the timer counts down to 0, G7 will go into a information alarm to inform the user to check the screen. Pressing and holding the up and down arrows for three beeps will silence the alarm and clear the timer.
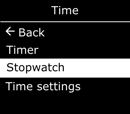
Stopwatch
G7 also has a new option to start a stopwatch on the device:
1. Press OK to open the main menu.
2. Scroll to the Time option and press OK to select.
3. Select the “Stopwatch” option. You will see a screen with a stopwatch at 00:00:00.

4. To start the stopwatch, press the OK button.
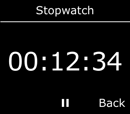
Once the stopwatch is started, it will count up in second intervals. It will continue to count up even if you leave the stopwatch screen and return to the menu. You can see how long the stopwatch has been running by opening the Time menu to see it displayed in-line with the “Stopwatch” option, or by selecting this option to open the stopwatch screen.
5. To pause the stopwatch, select the “Stopwatch” option again and press the OK button. Press OK again to resume the stopwatch from where it was paused.
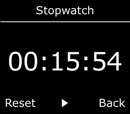
6. To reset the watch back to zero, press OK to stop the stopwatch, and then the up arrow to reset.
Have questions about the 3.450 firmware update, G7 products or otherwise? Contact our Customer Care team


